In today’s modern era of Artificial Intelligence and Serverless computing, “BOT” is one of the most buzz term. We have been using BOTs for quite a long but still, if the term is unfamiliar to you, you might ponder what it is and how it works precisely. In simple terms, BOT is an intelligent and smart program designed to perform robotized/routine tasks. Chatbots powered by AI is helping enterprises transform their customer experience.
In this article, I am going to articulate on how to fabricate a QnA (FAQ) ChatBot leveraging Azure BOT Service and QnA Maker – a Microsoft Cognitive service and consume the chat Bot in SharePoint Online environment.
QnA Bot effectively processes questions from the end user, searches up for a matching question (require not be exact) in the knowledge base, retrieves the appropriate response with the highest score and sends it back to the end client. Despite the fact that the question asked by a person isn’t the very same way it is put away in the information base, the BOT is sufficiently wise to coordinate the answer in the source and give answers in like manner. However, if the BOT doesn’t discover a match in the mapped knowledge base, it will answer back with a pre-defined “No match message”.
As stated above, I will consume QnA Maker Cognitive Service to build the QnA Bot. Briefly, QnA Maker is a web-based Microsoft Cognitive Services that trains AI to reply to any questions in a conversational pattern. It basically provides an FAQ data source/knowledge base with a predefined set of FAQ data, which can be queried from BOT/ Application. The knowledge base content is stored in Azure Storage by the QnA Maker tool.
Now we have a brief understanding of what is QnA Bot and QnA Maker service. Let’s follow the below steps and build the BOT, and consume it in SharePoint Online. This will give us the practical handle of the process.
The first step in this process is to create and nourish the FAQ Data source/ knowledge base for the BOT
Let’s navigate to QnA Maker web portal and login with your Microsoft Live account to create a QnA service and the knowledge base. In the portal, click on “Create a new service” menu link. This will open a form to fill in the details of the service
- Name of the service
- FAQ data source/knowledge base in the below format
- You can directly enter the public website URL of an existing FAQ page
- You can upload a file/questionnaire with questions and answers by clicking on “Select file”. The information about restricted file format and size is displayed in the form.
- You can do either of the above (a or b) or both or multiple websites or multiple files or you don’t have to do either and just type questions and answers from scratch. It’s completely up to you. You can create questions and answers post creation of the service.
Once the service is created, you will be presented with the below screen
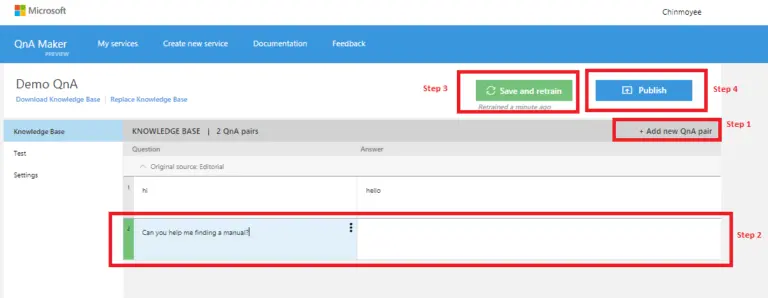
Follow the steps as mentioned in the above figure
Step 1: Click on “+Add new QnA pair”. This will enable the placeholder to add new questions and answers to the knowledge base
Step 2:Add question and answer pairs
Step 3:Click on “Save and retrain”. This will extract data and train the knowledge base
Step 4:This will publish and push the changes. Before publishing the changes, verify if you are getting correct responses from your knowledge base
To verify the knowledge base, click on “Test” link in the left navigation. Let’s consider the question “Can you help me finding a manual related to semiconductors?”Lets’ type the question as “find manual”. Even though this doesn’t match the exact question what is stored in the knowledge base, the BOT is intelligent enough to find a match and reply back. If the BOT doesn’t find any suitable answer in the knowledge base, it extracts all answers which it thinks are relevant and list down the questions to the end user.
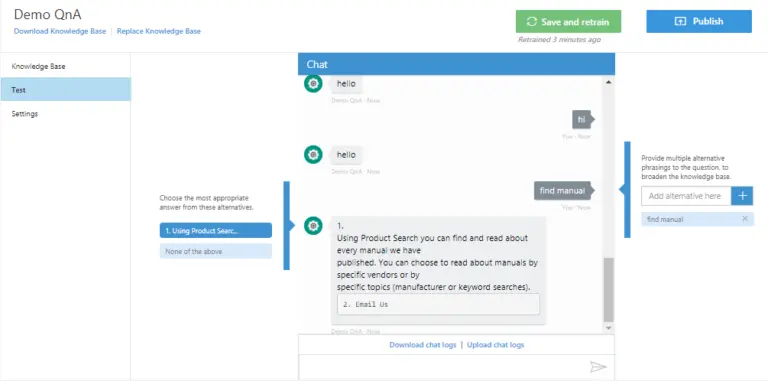
Post verification of the knowledge base you can publish it. Once published, a summary screen of the count of questions and answers will be displayed. Even you will be provided an option to view the differential data of your knowledge base.
Click on Publish in the summary screen will deploy the knowledge base for the service and the HTTP endpoint for the service will be exposed. The end-point can be consumed in a Bot/Application to process a question and respond accordingly.
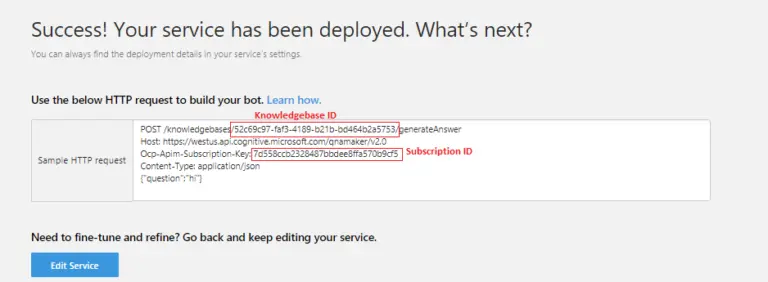
In the above figure, we can see the end-point for the service. Also, this provides the knowledgebase ID and subscription key for the service. Make a note of these IDs, which will be required in the further steps while creating the BOT
So, we are done with the creation of the knowledge base for the BOT.
Let’s go ahead and create the BOT using Azure BOT Service
Login to Azure Portal, search for “Web App BOT” in the Azure marketplace and click on “Create”
This will open-up a form and ask us to enter the details for the BOT. Enter the details accordingly and select the template for the BOT as “Question and Answer”. You can select the pricing tier as F0 as we are creating a Demo Bot.
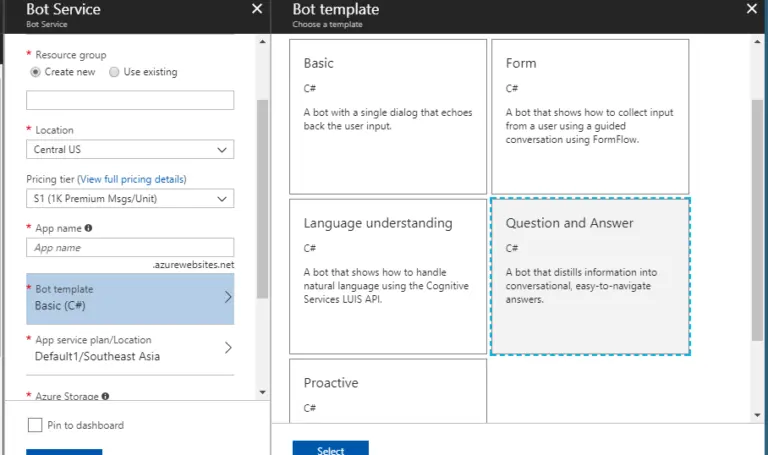
Once you enter all required details, click on Create, which will allow the BOT to use QnA template. Before testing the BOT, we need to feed the Knowledge Base ID and Subscription Key (that I mentioned before) of my QnA Service to the BOT.
Navigate to the Demo BOT App that you created in the above step. To feed the QnA service details to the BOT, click on “Application Settings” link from the left links blade.
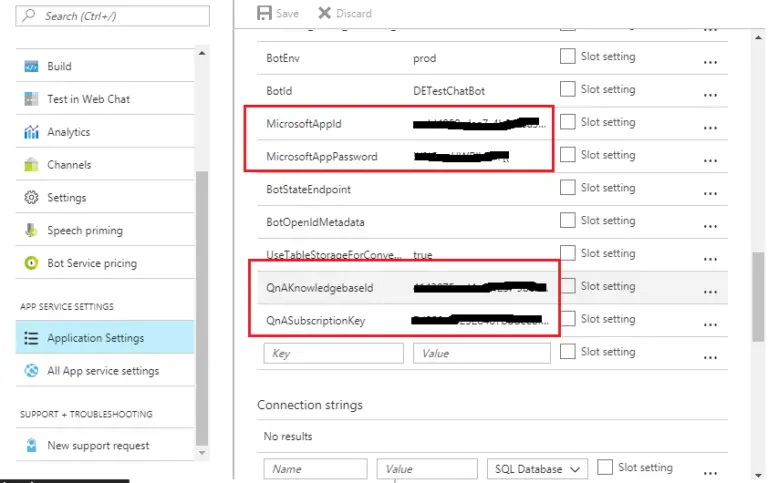
In the above figure, you can see keys:QnAKnowldegebaseIdandQnASubscriptionKey, enter the values (that we have noted before) for the keys and click on Save.
We are done with the set-up and all configurations. Now we can test the BOT in web chat. To do so, click on “Test in a Web Chat” from left links blade and let’s consider the same question that we have used for verifying the knowledge base – “Can you help me finding a manual related to semiconductors”.
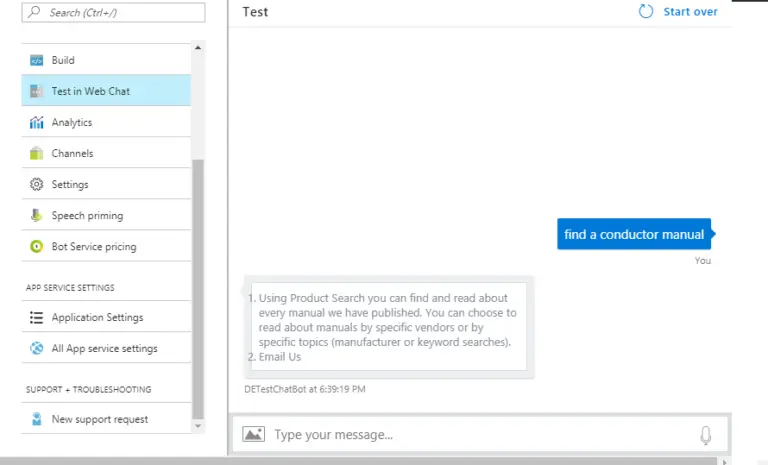
Now we are all set with the BOT. We can also download the source code of the BOT and do customizations. Click on “Build” link in the left blade and download the source code.
Below is the screenshot of the downloaded source code of my sample BOT.
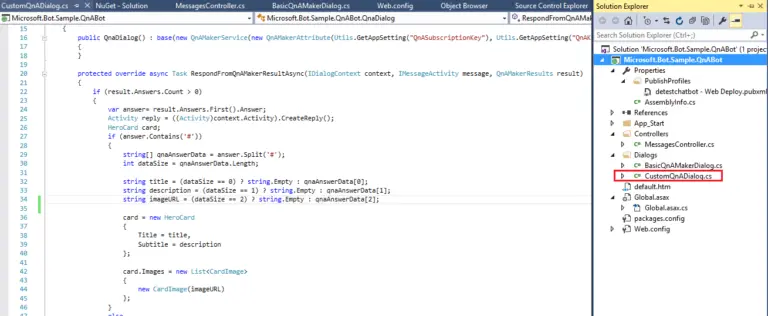
Here, I have added a custom Dialog class “CustomQnADialog”. And, I have added the Knowledge base ID and Subscription key in the Dialog code.

In the above dialog code, if we set the last optional parameter ‘top’ to some value greater than 1, the QnA Maker utilizes active learning to learn from the utterances that come into the framework. In this process, QnA Maker responds with different pertinent QnAs for low certainty situations and requests that end user stamp the right response. The end user feedback is logged and models are refreshed once the system has assembled enough illustrations. Users will be able to see enhanced response based on the feedback received. However, if this value is not set or set to 1, the Bot responds back the answer with the highest score.
Let’s say we need to respond back to questions with a multi-line of description and images, we can trim the data accordingly in the knowledge base. Accordingly, we can customize the Dialog Code of the Bot to manipulate the data received from the knowledge base and respond back to end user.
Follow the below steps to integrate the BOT in SharePoint Online
Navigate to the above created Web App Bot in the Azure Portal. Click on “Channels” in the left blade. This Bot can be connected to all channels displayed over here. This also gives the provision to configure web chat. Click on “Get Bot embed codes”, will open a pane with the embed code.
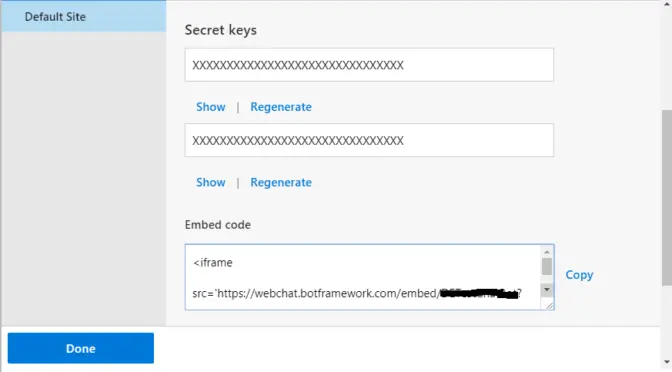
The iframe src URL has a secret token parameter. Click on “Show” for the first secret code, copy it and append it to the iframe src URL
Now, add a content editor or script editor web part in a page in your SharePoint Online portal. Embed the above iframe code in the web part and publish the page. We are all done now! The QnA bot will be now rendered in the page on your SharePoint Online site.

We can also customize the display of the BOT to expand and collapse accordingly.
Finally, we are done! Is it not interesting? We can make it even more interesting by integrating other fabulous Azure Cognitive Services like Vision, Speech and Language and Machine Learning. So, now you can have your own QnA bot up and running and play around with the Bot.
